NOTE (March 2014): Blogger has moved the function to set the category URL from the Pages section below to the Pages Gadget. You don't add category links in the Page but add them in the Gadget - this will be updated soon. It was a great addition to Blogger when they added the tab menus as a feature. However, many times I've heard people asking how they can alter their menu tabs to be Blogger categories instead of Pages. Good news is that this is a very simple thing to do and only requires a few steps.
What you may not have realized is that in the Blogger Pages menu item is the ability to link to a URL instead of a Blogger Page and that Blogger categories (or labels) are just that - blogger URLs.
 In my Wordpress test template blog you can see I have 2 labels or categories defined. Once you click on it go up to your browser's URL to see what the category link is. Interesting result -- they're just searches:

You can sese that the label URL is just(yourblog)/search/label/(labelname). Make a copy of your label URL and save it off to the side for a moment.
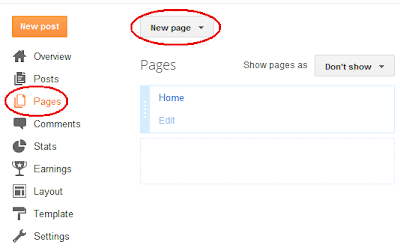 What you'll see at this point is a drop down selection of if you want a new Blank page or to enter a Web address. Select the 'Web address' like so:

What you'll want to do now is to enter your Lable/Category in the first text box and the URL you just saved in the 'Web address (URL)' box like this:

Press 'Save' to add this category page to your list of Pages. If you read some of my earlier tutorials you saw that in order for tab menus to appear on you blog, you first have to set the 'Show pages as' to 'Top tabs':

in order for them to show up on your blog. Be sure the 'Pages' widget is added as well in the Layout manu of your blog in the right spot - this is where the Tabs will show (ignore the 'Edit' button here - just make sure the Pages widget is there):

Once you save your template you should see your new tab at the top of your blog:
 If you click on this what happens is you're directed to the URL you entered in the Pages section. One thing you may notice right away, however, is this not so nice search result image at the top of your blog:

 If you hadn't noticed there was a change in the html editor for Blogger. Key things to note are the expand triangle on the side, the new 'Jump to widget'dropdown, and the selections within:
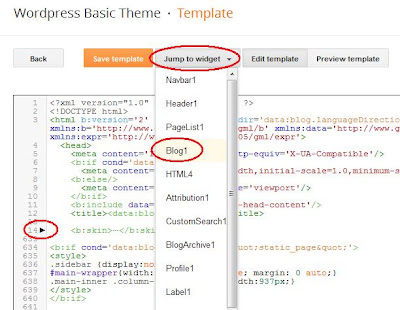
The search result image that we want to remove is located just above the Blog section of your template. In my case it is called 'Blog1' which is the default. However, yours may have a different name if you named your Blog widget different. Just select that from the drop down and expand the triangles next to the lines that have widget: id='Blog1' and widget: id='main' like this:

What you're looking for is the ling that says b:include data='top' name='status-message'. That is the status image we want to disable. Just add the html comment characters (<!-- and -->) to both end like I've circled above to disable that message. Save your template.
That's it! You now have a menu tuned to your categories rather than pages. This will be especially useful if you have a news site. You can look at my tab example called 'Backgrounds' on my Wordpress test template blog here:

Good luck!
What you may not have realized is that in the Blogger Pages menu item is the ability to link to a URL instead of a Blogger Page and that Blogger categories (or labels) are just that - blogger URLs.
Getting the Category URLs
First thing you want to do is to make sure each of your posts have labels defined. If you want your posts to be seen in only one category then you can only give each post a single label. Next stepis to find the URL of one of your Blogger categories by clicking on the category directly like this:
You can sese that the label URL is just(yourblog)/search/label/(labelname). Make a copy of your label URL and save it off to the side for a moment.
Setting the Tabs to Point to a URL
Now, go to the Blogger main menu and select the 'Pages' item and 'New Page':


in order for them to show up on your blog. Be sure the 'Pages' widget is added as well in the Layout manu of your blog in the right spot - this is where the Tabs will show (ignore the 'Edit' button here - just make sure the Pages widget is there):

Removing the Search Label
If you don't like that appearing you can remove it by editing your template directly. Just go into the template editor and choose 'Edit HTML':

The search result image that we want to remove is located just above the Blog section of your template. In my case it is called 'Blog1' which is the default. However, yours may have a different name if you named your Blog widget different. Just select that from the drop down and expand the triangles next to the lines that have widget: id='Blog1' and widget: id='main' like this:

What you're looking for is the ling that says b:include data='top' name='status-message'. That is the status image we want to disable. Just add the html comment characters (<!-- and -->) to both end like I've circled above to disable that message. Save your template.
That's it! You now have a menu tuned to your categories rather than pages. This will be especially useful if you have a news site. You can look at my tab example called 'Backgrounds' on my Wordpress test template blog here:
Good luck!