How to Add Google Analytics to Blogger
/
0 Comments
There is probably not a more interesting real-time or site statistics tool than Google Analytics. If you haven't used it before you'll find that it blows away the Blogger stats tool in the Blogger editor. I haven't added it to Blogger Tips Pro earlier since I've been intending to create the tutorial - but kept putting it off for other reasons. I do use it for my other sites, however.
Let's get started. If you don't have a Google Analytics account yet you just need to sign into your Blogger Google account to start. Now, if you have a large number of blogs under a parent name or company then I would suggest you monitor all of your sites from a single account. You be the judge.
Creating a Google Analytics Account
Once you're logged in, simply go to http://analytics.google.com - you should see a page like this. Just select 'create an account':Now that you're into the main sign-up page just click the 'Sign up' button to start:
You'll now be presented with a number of options to get your account started. I chose 'Website' and 'Universal Analytics' as my options to start. I felt that the benefits of the Beta would be good to try out.
Scroll down the screen to find the rest of the options - enter your 'Account Name', 'Website Name' and 'URL':
There are some more options near the bottom of the sign-up screen called 'Data Sharing Settings' and I will let you pick and choose if you want to opt-in on those. Once you've done that just click on the 'Get Tracking ID' prompt at the bottom of the page, accept the Terms and Conditions and you're ready!
Adding Your Analytics ID to Blogger
You'll be brought into the main page with the 'Tracking ID'. One point to remember is that the ID is tied to a specific blog. If you have more that one blog be sure to go back in and create another ID for a different blog.I've highlighted the ID below - this is the ID you're going to want to copy and paste into Blogger. Be sure to copy this ID right now by highlighting it and using a mouse click copy:
Now, go back and log into Blogger - open your specific blog - and choose the 'Settings', 'Other' menus and scroll down to the bottom of the form to find the 'Google Analytics' entry field like this:
Viewing the Google Analytics Data
The best part of the analytics screens is just the overall breadth of what data is provided. My goal in this tutorial is not to give you an in-depth view. You can take a look at this step-by-step tutorial. However, go back into your Analytics account to get to the reporting data.The main page you want to look at is the 'Reporting' screens where you'll see your traffic and other analytical information:
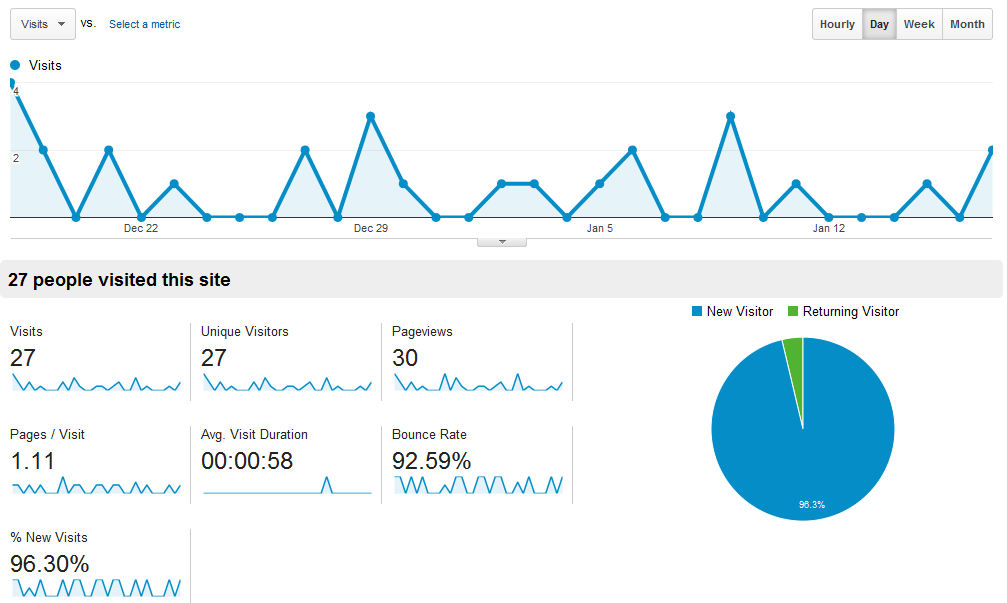
Here is a snapshot of one of my old sites with the type of data you'll see in your main Google Analytics dashboard:
My favorite view in the Analytics page is the real-time view of who's hitting the site. Here is BloggerTipsPro.com literally minutes after I added the ID:
You can see that a desktop, mobile and tablet hit the blog and what pages are being access. That is a very cool view of your site's traffic. There's so much more you can do with what Google provides. Enjoy!!


