Showing posts with label Wordpress. Show all posts
Hey guys, in our day to day life the part of technology are integral. Sometime for e. on your personal mail account you might be getting lot of spam mails. But spamming is not stop there, On some blog website we used to see lot of comments which are repetitive. Those are also spam. Thankfully over the years, we have learnt several ways to combat comment spam in WordPress. In this article, we will share some of the most valuable tips, and WordPress plugins to combat comment spam in WordPress.
  •  Activate Akismet

akismet
Akismet is one of the most valuable plugins for WordPress. You do not need to download it as it comes pre-installed with all WordPress installation. But you do need to activate it and get an API key. You can find out more about Akismet in ourAkismet 101 Guide for WordPress Beginners. Without this, you have no chance against SPAM. Akismet does a great job in catching SPAM comments. Although sometimes good comments get filtered as SPAM, but you can always recover them by going through your SPAM comments regularly.
  •  No follow Comment Links

Sometimes new bloggers add plugins to remove nofollow attribute from comment author links. They think that by making these links dofollow they will be able to encourage more users to leave comments. This results into a very high number of spam comments. Even non-spam comments are usually submitted by users who are not interested in the discussion but the link back. Remember, its always about quality not quantity. It is always a bad idea to use plugins that share link juice via comments. If you are not using any such plugin, then thats great you can move on to the next step.
  •  Reduce Comment Spam Using Cookies

To use this method you will need to install and activate the Cookies for Commentsplugin. Most spam bots are automated scripts, and in order to spam more sites in less time they don’t download any images or stylesheets. This plugin sends users a stylesheet or image file whenever they access a page with the comment form. If a user’s browser automatically downloads those files then the plugin sets a cookie identifying them as legit users. To learn more how to use this clever solution, checkout our guide on how to reduce comment spam using cookies.
  • Block Spam Comment Bots Using Honeypot

Honeypot technology is an effective method to trick spambots into identifying themselves. First you need to install and activate the WP Spam Fighter. Upon activation simply go to Settings » WP Spam Fighter and enable the honeypot protection. This will add a hidden form to your comments area visible only to bots. These spam bots are usually programmed to fill out all fields in a form. Learn more about how to block spam comment bots in WordPress using honeypot.
  • Add Captcha Verification

Using WP-reCAPTCHA plugin, you can enable recaptcha challenge on your comment forms. Recaptcha shows an image containing characters, users need to type those characters to prove that they are human. While recaptcha is an effective way of blocking spam bots, it does nothing to prevent your site from manually submitted spam comments. Another concern with recaptcha is that they make it difficult for users to submit comments. On the other hand, reCAPTCHA is a quick and effective way to block spambots. See our guide on how to block spam comments in WordPress with CAPTCHA.
  • Removing Website URL Field from Comment Form

The URL field in the comment form attracts not only spammers (both automated and human) but it also invites people who have absolutely no interest in discussion at all. These comments usually contain a line of two of irrelevant non-sense, the comment author name will contain a keyword or a combination of real name with keyword like Sally from Dunder Mifflin, or John @SEOconsultants, etc. Removing the URL field from comment form will discourage this kind of behavior on your website. See our guide on how to remove URL field from WordPress comment form.
  • Disable Comments on Media Attachments

WordPress automatically creates image attachment pages where users can see an image and even leave a comment for it. IF you are linking your images to the attachment page, then after a while you will have lots of attachment pages with comments enabled on them. If images are the central part of your content then that’s fine. But if you don’t want users to comment on images instead of posts then you should turn off comments on media attachments. Here is a tutorial on how todisable comments on WordPress media attachments.
  •  Disable HTML in Comments

Another handy tip to discourage links in comments is disabling HTML in comments. The easiest way to do this is by using Peter’s Literal Comments plugin. Simply install and activate the plugin and any comments submitted to your site after that will get all HTML parsed through WordPress filters. This will change double quotes, less than and greater signs into HTML entities. Learn more about disabling HTML in WordPress comments.
  •  Less Annoying Captcha

As we mentioned earlier that many users find CAPTCHA annoying and disruptive. A less annoying alternative to CAPTCHA is the Math Quiz plugin, which asks users to solve a simple math problem to prove that they are human. Simply install and activate the plugin, and then visit Settings » Math Quiz to configure it. The plugin allows you to modify comment form CSS, though in most cases you wouldn’t need to. It also allows you to choose where you want an image based math quiz or simple plain text quiz. Plain text quiz is easy to read but also easy to solve by spambots. The image based math quiz is not that readable, but is slightly difficult to solve by spambots.
10. Disable Trackbacks
A big portion of comment SPAM is trackbacks. For some blogs it is not even necessary to have trackbacks. You can choose to disable trackbacks on your entire blog, or in an individual post. This can prevent comment SPAM and it is very easy to do so.
disable trackbacks
You can find the above option by visiting Settings » Discussion. This will turn off trackbacks for your entire site. But if you want to turn off trackbacks on specific posts, you will need to specify it either when writing a post, or edit a post and change this option.
Disable trackbacks and comments on a single post
  • Turn off Comments on Old Posts

WordPress allows you to set a comment closure deadline. Simply go to Settings » Discussion, under ‘Other comment settings’ you will see the option ‘Automatically close comments on articles older than’. Check the box next to this option and enter the number of days you want comments to be displayed on a post.
Close comments on older posts in WordPress
WordPress will now automatically close comments on posts older than the number of days you defined for this option. If you need, you can override comment deadline in WordPress for individual posts where you would like comments to remain open.

  • Switch Off Comments

In case you feel that you don’t need comments on your WordPress site, or comment moderation goes out of your hands, remember that you can always switch off comments in WordPress. All you have to do is go to Settings » Discussion and uncheck the box next to ‘Allow people to post comments on new articles’.
Switch off comments in WordPress
You can also make comments for registered users only by checking the box in your Settings 

        I've got a confession. I'm a serial blogger. I find a new platform to play with every once in a while, and I'll start a new blog. I hate deleting that blog a year later just because I don't want to pay to host it anymore. I'd rather keep all my blogs, whether regularly updated or semi-maintained. Fortunately, I can keep them all in one place for free by using Blogger.

Moving a blog from WordPress to Blogger is actually fairly simple as long as you've got administrative access to your WordPress blog. Google's Chicago office is the home to an engineering team that actually makes this pretty easy: The Data Liberation Front. Their goal is to make it easy to move data to and from any Google tool, and while they don't have a tool to directly move your WordPress site to Blogger with a single click, they've simplified the process and host the open-source resources we need.

One thing that won't import is the general look and feel of your blog. That's handled by the theme. You can pick a new theme in Blogger, but you can't import your WordPress theme. 
First Step - Export 
The first thing you'll do to export your WordPress blog. If it's a single person blog you maintain, this usually isn't a problem.
1.      Log in to your account wherever you're hosting it. In my case, I'm using a blog hosted on my own domain with my own installation of WordPress software. You may have started a blog on WordPress.com. The process is the same. 
2.     Go to the Dashboard.
3.     Click on Tools: Export
4.     You'll get some options here, so if you want only the posts or only the pages, you can do that. In most cases, you'll want to export both.
5.     Click on Download Export File. 
You'll end up  downloading an export file with a name that looks something like "nameoftheblog.wordpress.dateofexport.xml" This is an XML file specifically designed as a backup of WordPress content. If your intent is to move your blog from one WordPress server to another, you're set. In this case we need to massage the data to get it to the format we need.
The Second Step - Conversion 
The Data Liberation Front hosts an open source project called the Google Blog Converters, which is designed to do exactly what we need. The WordPress to Blogger conversion tool will take that XML file and change the markup into Blogger's format.
1.      Upload your file using the WordPress to Blogger tool.
2.     Press Convert.
3.     Save your converted file to your hard drive. 
In this case, you're going to get a file named "blogger-export.xml." The only thing that's really changed is the XML markup.
The Final Step - Import
Ok, now you've got your old blog data converted to a format for Blogger. Now you've got to import that blog into Blogger.
You could start a new blog, or you could import your content into an existing blog. The dates of your posts will be whatever date they were on WordPress, so if you had an old blog you forgot about or didn't realize you could import, this is a good way to backfill your content. 
1.      Log into Blogger, and go into the settings for your blog. The steps you use to get there may vary a little, depending on whether you're using the old or new version of the Blogger dashboard.
2.     Go to Settings: Other
3.     Click on Import Blog
4.     You'll need to browse for your blogger-import.xml. (Don't try the original WordPress file. It won't work.) You may need to enter some CAPTCHA text. This is to prevent someone from using a script to hack your account and import a bunch of spam posts.
5.     Choose whether or not to automatically publish all posts. Uncheck this box if you want your posts to be imported as draft posts. It might be a good idea if you want to preview your work and make sure everything imported as expected.
Congratulations, you're done. Inspect your posts to make sure your images and content made the trip. 

Once everything is imported successfully, don't forget to let everyone know the blog has moved and hide your old blog. In WordPress, this is located in the Dashboard under Settings: Privacy. You should at least hide it from search engines, even if you elect to keep the posts publicly visible. You're welcome to leave both blogs as is, but this might be confusing to blog visitors. It might also impact your placement in Google search results, since duplicating content might make you look like a spam blog.
Though Blogger provides a very good standard Google search widget for you blog, wouldn't you like it to look and feel a bit more modern much like a Wordpress site? Well, given that you may want to spice your blog up a bit, I've provided a simple search form that gives you some style.

Under the hood, the Google search widget really just calls an interface that does the searching for you. Using some basic HTML, you can call this same interface with a custom form. The difference between a Google widget and the custom one is that you need to get an image uploaded, create an HTML form, and add some custom stylesheet code.

Though the Google widget is a bit more diverse for searching both internally on your site and externally, I still like the search eyeglass view.

Upload a Search Icon


First step is to get a magnifying glass image uploaded to your blogger site. The trick is to either add the image to a post or sidebar, copy the URL that blogger used to store it, then use a style command to hide the image (if you want to hide it).

You can use the one I've added to this post if you wish. Just right click on the image and choose 'Save Picture As...' to save it on your local hard drive:


If you take a moment to look at this specific URL of this image by right-clicking on it and selecting Properties......you'll see a very long Blogger URL such as


What you'll want to do is either add this image to a Post or in the Sidebar to get it uploaded to Google. You don't have to worry about using the image from an external site. Once uploaded you can then copy its full URL as the search box image background. Be sure you use the image setting of 'Original Size'.  Just remember to get the image uploaded to your site.

Add the Search CSS Code


The next step is to add this CSS code to your template. You can do it one of two ways - either by adding it to your template manually, or, using the advanced menu item in the template designer like this:


The CSS code you want to add is the following:

/* Forms */
input[type=text],
input[type=password],
textarea {
  background: #f9f9f9;
  -moz-box-shadow: inset 0 1px 1px rgba(0,0,0,0.1);
  -webkit-box-shadow: inset 0 1px 1px rgba(0,0,0,0.1);
  box-shadow: inset 0 1px 1px rgba(0,0,0,0.1);
  border: 1px solid #ddd;
  color: #222;
}

input[type=text]:focus,
textarea:focus {
  color: #363636;
}

textarea {
  padding-left: 4px;
  width: 98%;
}

input[type=text] {
  padding: 4px;
}

input#searchinput {
  background: url(YOUR ICON LINK HERE!)   no-repeat 5px 6px;
  -moz-border-radius: 2px;
  border-radius: 2px;
  font-size: 14px;
  height: 22px;
  line-height: 1.2em;
  padding: 4px 80px 4px 30px;
}

input#searchsubmit {
  display: none;
}

Just copy and paste this CSS code into your Add custom CSS dialog box like so:


You'll now have the CSS code for the search box ready for the actual input form. Please note that you need to add the magnifying glass search icon url link from your uploaded image - as I showed you in the first section. Just replace my 'YOUR ICON LINK HERE!' with your full URL.

Add the Search Input Form


Ok, you're now ready to add the custom HTML code for the search box. Simply create a new HTML Gadget in your sidebar.


In the HTML Gadget paste the following code:

<form action='YOUR MAIN BLOG URL/search/' id='searchform' method='get'>
<input class='field' id='searchinput' name='q' placeholder='Search' type='text'/>
<input class='submit' id='searchsubmit' name='submit' type='submit' value='Search'/>
</form>

I've highlighted that you need to add your blog's main URL in the form action. For example, if your blog URL is 'pontiac-collectors.blogspot.com' then enter 'http://pontiac-collectors.blogspot.com/search/' as the full form action. In my case I have 'http://www.googlsupport.blogspot.com/search/'.


Go ahead and hit 'Save'. If all goes well you should see the following search box on your site:


If you don't see this, or, the search magnifying image is missing go back and check that you changed the CSS code to have the full image link and that your Blogger site's URL is in the HTML Gadget.

To search just enter the desired text in the box and press Enter. You should be good to go!

Remember, this is just a basic search bar - if you want to learn more about customizing your search input form take a look at this article - Creating an Awesome Search Box.


After completing Part 1 of this tutorial, I see that this part is going to be the trickiest such that I think I'll just focus this post on adding the top image and repositioning the title and description. As much as I wanted to not touch the template directly, I discovered that we're going to have to make one change deep within the Blogger Simple template.

Before we start be sure to either practice these changes in a test blog or backup your template before starting. This is critical!! Be sure to read my post How to Backup Your Blogger Template to learn how to do this.

Adding a Banner Image to the Wordpress Theme

Ok, from Part 1 we were ready to add the banner across the top of the template. I'm not going to go into a deep tutorial on how to create and format a banner image other than to say you need a .jpg (JPEG) or .png (Portable Network Graphic) image that is formatted to approximately 940x165 pixels ready to go. If you don't know how to do this check out the video tutorial called How to Make Blog Headers, or, just do a search for creating a Blogger or Wordpress header image in Google.

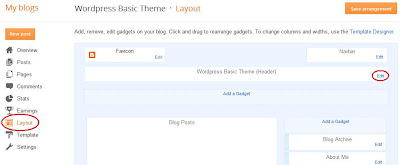
To add a banner in Blogger is simple - just access your template's layout using the main menu 'Layout' selection and press the 'Edit' link in the 'Header' section like this:

Blogger banner edit


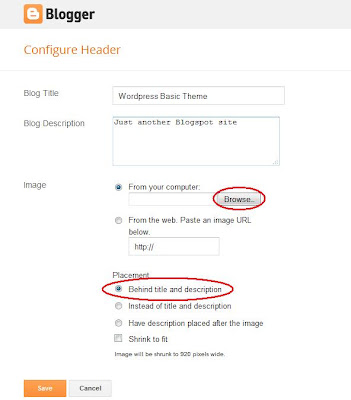
Once you're in the edit dialog, select your banner image from wherever you saved it on your hard drive using the 'Browse' button. Be sure the 'Shrink to fit' option is not selected:

Blogger banner image upload


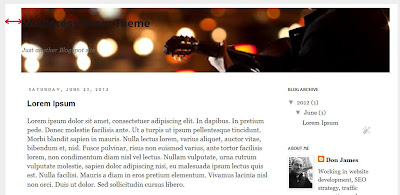
Things are going to look a bit odd at this point - the first reason is that your banner may not be exactly 940 pixels wide - the second reason is that the Blogger title and description are located within the image. Don't worry, we'll adjust the template width and title later. However, we need to customize the CSS to reduce the padding around the template (which I highlighted below with the red arrows).  Here's what the template looks like so far:

Wordpress theme phase two

Jump back into the Blogger Template Designer ('Advanced' menu item - review Part 1's post to find it) from your main menu to add some custom CSS code like we did yesterday. We want to set the blog's inner padding ('.content-inner') to about 20 pixels like this:


The left side of your blog should look proportionally good - however, the right side might be off due to the blog width. Stay in the Blogger Template Designer and select the 'Adjust widths' option to alter the full width of the 'Entire Blog' so that the right side margin/padding looks aligned with the left (note that I also adjusted the sidebar width a bit:


At this point your template should have a good banner image with the appropriate widths set.

Adjusting the Blogger Template HTML Code

Now comes the hard part. As you noticed earlier the blog's title and description fields are now located within the image itself. We need to move these above banner. I thought some simple CSS code might do it - but, I haven't found a good way yet. So, we're going to move some of the template's HTML around a bit and add a couple of CSS formatting commands.

First let's jump into the template's HTML code. Go back to the blog main menu and choose 'Template' and 'Edit HTML' button:

Note that you'll get the warning message that tampering with the template may cause you problems in the future. Our changes will be small so don't worry - go ahead and press 'Proceed':


Before you do anything click on the checkbox named 'Expand Widget Templates' as shown below. You are going to be searching for the HTML code where the banner is actually rendered.

In the HTML code, do a search from your browser using the Crtl-F key to find the following string "div expr:style='&quot;background-image". You should be able to find it - if not, try manually searching for it - you should find it about one third of the way down the template:

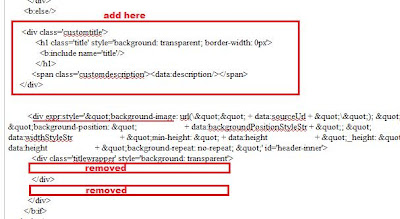
Note that I've underlined two parts - the title and description fields that will need to be modified. This first thing I want you to do is to delete the sections that I've highlighted below - but DON'T save yet:

Once you've deleted these four lines be sure to press the 'Preview' button (two images above) to make sure the template is not messed up. You should see the blog without either the title or description within the image. If you do get an error, just go back and press 'Close' without saving the template - that way your mistake won't be saved.  Here is the code with the sections removed:


If the preview worked ok, then the next step is to add the following code to the template just about the search text we found - here is the code we want to add:

<div class='customtitle'>
    <h1 class='title' style='background: transparent; border-width: 0px'>
        <b:include name='title'/>
    </h1>
    <span class='customdescription'><data:description/></span>
</div>


Find the search string again "div expr:style='&quot;background-image" that is just above the sections we removed. We're going to paste the code just above this line like so:

Alter HTML code in Blogger template

Press the Preview button to make sure the code works - here's what you should see!


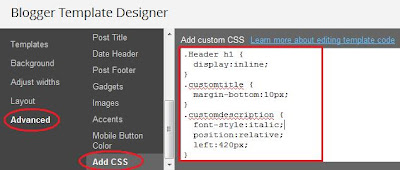
Now the title and description are positioned out of the image boundary. The last step for this part is to position those elements correctly using some CSS code in the Blogger Template Designer ('Advanced' menu item) again. Just add the CSS code in the image to position the title and description correctly. You might have to tweak the description left distance a bit:

Add CSS code to Blogger template

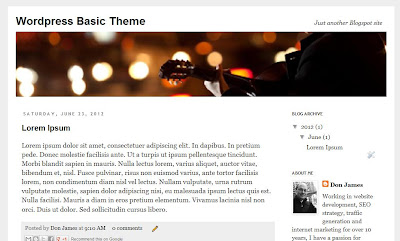
A bit of work - but, take a look at the template now - it's really coming together:

Wordpress theme for Blogger

Next up, the final settings for the sidebar and highlighting modifications. Enjoy!
Powered by Blogger.
Blogger Template by blogger.com