Showing posts with label Blogger Customization. Show all posts
Your blog promotion on social media especially Google plus one have became one of the powerful factor to survive from the latest Google algorithm updates. Your social media exposure on Google Plus is going to play an effective role in upcoming days according to these algorithms. You might know why Google plus is given highest priority as it is one of the proud service of Google. So we need to get more +1s for our blogs to stand strong and survive any algorithm updates. To do so, shouldn’t you use some unique style Google +1 button for your blog to gain more attention of visitors towards it. So I thought of creating a new and unique style of Google +1 button for blogger blogs and I have come with the tutorial on it.

You can notice the live demo of it on my blog itself. The major thing to be noticed in this Google +1 button is, this button operates uniquely for each of your blog posts and looks simplified. This unique Google +1 button allows users to +1 your blog posts individually and it doesn’t +1 your complete blog or homepage like other Google plus one buttons. So let us come to the topic now and move forward with adding this Google +1 unique style and unique operable button for each of your blogger blog posts.

How To add Google +1 Button for Individual Blog posts of Blogger

1. Go to blogger dashboard –> Template –> Edit Html (Tickexpand widget template option).
2. Find for </head> tag and add the following peace of code just above it.
<!– Unique style Google +1 button by BloggerTricks.biz –> <script type=’text/javascript’>   (function() {     var po = document.createElement(&#39;script&#39;); po.type = &#39;text/javascript&#39;; po.async = true;     po.src = &#39;https://apis.google.com/js/plusone.js&#39;;     var s = document.getElementsByTagName(&#39;script&#39;)[0]; s.parentNode. insertBefore(po, s);   })(); </script>
3. Now find(Ctrl+F) for <div class=’post-header-line-1′> and add the following peace of code just below it.

<b:if cond=’data:blog.url == data:blog.homepageUrl’> <div style=’ background: transparent url(https://blogger.googleusercontent.com/img/b/R29vZ2xl/AVvXsEgs-nCre44PPvYm1oUtvVcPGecG5GDhtlQqVdIs6rz2UJ2LugFuch40AVa81L8mt-_VydEXlRBGOw2tdlW13fpEANMXYr-ikQxu-CxG-ratSfdlVA70J9sq7pmxFhV9doqehTJ3PSM5zF8/s1600/call.jpg) no-repeat; display: block; width:65px; height:70px; float: left; margin: -40px 2px 0 -79px; padding: 4px 0 0px 8px; border: 0; ‘> <g:plusone annotation=’bubble‘ expr:href=’data:post.url’ size=’tall‘/> </div></b:if>

Hint:-
You can switch the button size between small, medium, large and tall.
You can switch the annotation between inline, bubble and none.
4. Save the Template.

 If you need any customizations to be done, then kindly ask your query in the comment section below and I will be glad to help you on it. 


                    Now a days it has become very important to make responsive pages due to a many devices with different screen size available now and more people are using these mobile devices for browsing and reading. Responsive web pages should be designed to render properly on all devices.

Google search icon for favicon                             In blogger there are many responsive templates which are free and paid available for download. These templates are very helpful for making the your blog responsive.
Still in some templates, the pictures inserted in the posts are not responsive due to the fixed size options provided by blogger post editor.
In this case you can follow these simple steps to make the picture responsive. This method can also be used if you do not have a responsive template, but want the picture to be of certain percentage of the page body. For example you may want the image to fill the page body by width or you may want the image width to be half the size of the page width.


1.       Switch to HTML view in blogger editor after adding picture                                                                                           

2.      Find <img followed by link to the image
3.      Add the code style="width: 100%; height: auto;" after <img with a space separating img and new code.
4.      Preview and post.
5.      Do this only before posting. Because, blogger manipulates the html code when you edit again. This may cause problem with appeariance.
6.      For youtube videos embed the youtube iframe between the following code 
      &lt;style&gt;.embed-container {  
                      position: relative; 
                      padding-bottom: 56.25%; 
                       padding-top: 30px; 
                        height: 0; 
                         overflow: hidden;
                         max-width: 100%; 
                         height: auto; 
                  } .
          embed-container iframe, .embed-container object, .embed-container embed {
                position: absolute; 
               top: 0; 
               left: 0; 
               width: 100%; 
              height: 100%;
               }&lt;/style&gt;&lt;
              div class='embed-container'>

     Your YouTube video embed code from share option in YouTube video page </div>

Note:

·         If you have installed a responsive blogger template, but blogger default template is loading the you have to follow these steps to disable default blogger template for mobile.
·         By changing the value 100% to a lower value in code for image, it is also possible to keep the image always smaller by a percentage of page body.


Though Blogger provides a very good standard Google search widget for you blog, wouldn't you like it to look and feel a bit more modern much like a Wordpress site? Well, given that you may want to spice your blog up a bit, I've provided a simple search form that gives you some style.

Under the hood, the Google search widget really just calls an interface that does the searching for you. Using some basic HTML, you can call this same interface with a custom form. The difference between a Google widget and the custom one is that you need to get an image uploaded, create an HTML form, and add some custom stylesheet code.

Though the Google widget is a bit more diverse for searching both internally on your site and externally, I still like the search eyeglass view.

Upload a Search Icon


First step is to get a magnifying glass image uploaded to your blogger site. The trick is to either add the image to a post or sidebar, copy the URL that blogger used to store it, then use a style command to hide the image (if you want to hide it).

You can use the one I've added to this post if you wish. Just right click on the image and choose 'Save Picture As...' to save it on your local hard drive:


If you take a moment to look at this specific URL of this image by right-clicking on it and selecting Properties......you'll see a very long Blogger URL such as


What you'll want to do is either add this image to a Post or in the Sidebar to get it uploaded to Google. You don't have to worry about using the image from an external site. Once uploaded you can then copy its full URL as the search box image background. Be sure you use the image setting of 'Original Size'.  Just remember to get the image uploaded to your site.

Add the Search CSS Code


The next step is to add this CSS code to your template. You can do it one of two ways - either by adding it to your template manually, or, using the advanced menu item in the template designer like this:


The CSS code you want to add is the following:

/* Forms */
input[type=text],
input[type=password],
textarea {
  background: #f9f9f9;
  -moz-box-shadow: inset 0 1px 1px rgba(0,0,0,0.1);
  -webkit-box-shadow: inset 0 1px 1px rgba(0,0,0,0.1);
  box-shadow: inset 0 1px 1px rgba(0,0,0,0.1);
  border: 1px solid #ddd;
  color: #222;
}

input[type=text]:focus,
textarea:focus {
  color: #363636;
}

textarea {
  padding-left: 4px;
  width: 98%;
}

input[type=text] {
  padding: 4px;
}

input#searchinput {
  background: url(YOUR ICON LINK HERE!)   no-repeat 5px 6px;
  -moz-border-radius: 2px;
  border-radius: 2px;
  font-size: 14px;
  height: 22px;
  line-height: 1.2em;
  padding: 4px 80px 4px 30px;
}

input#searchsubmit {
  display: none;
}

Just copy and paste this CSS code into your Add custom CSS dialog box like so:


You'll now have the CSS code for the search box ready for the actual input form. Please note that you need to add the magnifying glass search icon url link from your uploaded image - as I showed you in the first section. Just replace my 'YOUR ICON LINK HERE!' with your full URL.

Add the Search Input Form


Ok, you're now ready to add the custom HTML code for the search box. Simply create a new HTML Gadget in your sidebar.


In the HTML Gadget paste the following code:

<form action='YOUR MAIN BLOG URL/search/' id='searchform' method='get'>
<input class='field' id='searchinput' name='q' placeholder='Search' type='text'/>
<input class='submit' id='searchsubmit' name='submit' type='submit' value='Search'/>
</form>

I've highlighted that you need to add your blog's main URL in the form action. For example, if your blog URL is 'pontiac-collectors.blogspot.com' then enter 'http://pontiac-collectors.blogspot.com/search/' as the full form action. In my case I have 'http://www.googlsupport.blogspot.com/search/'.


Go ahead and hit 'Save'. If all goes well you should see the following search box on your site:


If you don't see this, or, the search magnifying image is missing go back and check that you changed the CSS code to have the full image link and that your Blogger site's URL is in the HTML Gadget.

To search just enter the desired text in the box and press Enter. You should be good to go!

Remember, this is just a basic search bar - if you want to learn more about customizing your search input form take a look at this article - Creating an Awesome Search Box.


After completing Part 1 of this tutorial, I see that this part is going to be the trickiest such that I think I'll just focus this post on adding the top image and repositioning the title and description. As much as I wanted to not touch the template directly, I discovered that we're going to have to make one change deep within the Blogger Simple template.

Before we start be sure to either practice these changes in a test blog or backup your template before starting. This is critical!! Be sure to read my post How to Backup Your Blogger Template to learn how to do this.

Adding a Banner Image to the Wordpress Theme

Ok, from Part 1 we were ready to add the banner across the top of the template. I'm not going to go into a deep tutorial on how to create and format a banner image other than to say you need a .jpg (JPEG) or .png (Portable Network Graphic) image that is formatted to approximately 940x165 pixels ready to go. If you don't know how to do this check out the video tutorial called How to Make Blog Headers, or, just do a search for creating a Blogger or Wordpress header image in Google.

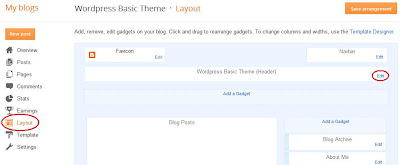
To add a banner in Blogger is simple - just access your template's layout using the main menu 'Layout' selection and press the 'Edit' link in the 'Header' section like this:

Blogger banner edit


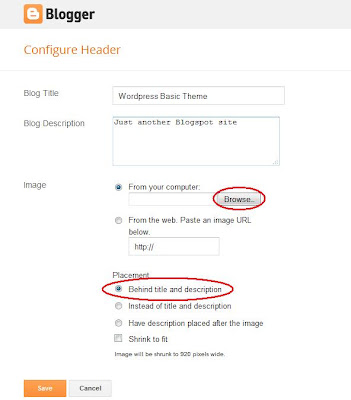
Once you're in the edit dialog, select your banner image from wherever you saved it on your hard drive using the 'Browse' button. Be sure the 'Shrink to fit' option is not selected:

Blogger banner image upload


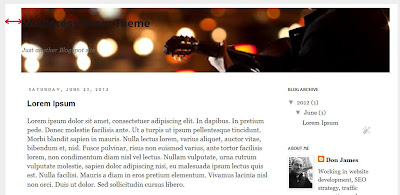
Things are going to look a bit odd at this point - the first reason is that your banner may not be exactly 940 pixels wide - the second reason is that the Blogger title and description are located within the image. Don't worry, we'll adjust the template width and title later. However, we need to customize the CSS to reduce the padding around the template (which I highlighted below with the red arrows).  Here's what the template looks like so far:

Wordpress theme phase two

Jump back into the Blogger Template Designer ('Advanced' menu item - review Part 1's post to find it) from your main menu to add some custom CSS code like we did yesterday. We want to set the blog's inner padding ('.content-inner') to about 20 pixels like this:


The left side of your blog should look proportionally good - however, the right side might be off due to the blog width. Stay in the Blogger Template Designer and select the 'Adjust widths' option to alter the full width of the 'Entire Blog' so that the right side margin/padding looks aligned with the left (note that I also adjusted the sidebar width a bit:


At this point your template should have a good banner image with the appropriate widths set.

Adjusting the Blogger Template HTML Code

Now comes the hard part. As you noticed earlier the blog's title and description fields are now located within the image itself. We need to move these above banner. I thought some simple CSS code might do it - but, I haven't found a good way yet. So, we're going to move some of the template's HTML around a bit and add a couple of CSS formatting commands.

First let's jump into the template's HTML code. Go back to the blog main menu and choose 'Template' and 'Edit HTML' button:

Note that you'll get the warning message that tampering with the template may cause you problems in the future. Our changes will be small so don't worry - go ahead and press 'Proceed':


Before you do anything click on the checkbox named 'Expand Widget Templates' as shown below. You are going to be searching for the HTML code where the banner is actually rendered.

In the HTML code, do a search from your browser using the Crtl-F key to find the following string "div expr:style='&quot;background-image". You should be able to find it - if not, try manually searching for it - you should find it about one third of the way down the template:

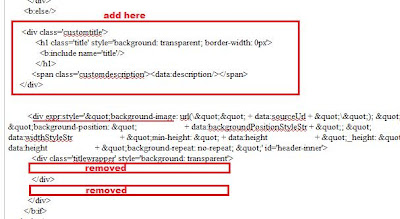
Note that I've underlined two parts - the title and description fields that will need to be modified. This first thing I want you to do is to delete the sections that I've highlighted below - but DON'T save yet:

Once you've deleted these four lines be sure to press the 'Preview' button (two images above) to make sure the template is not messed up. You should see the blog without either the title or description within the image. If you do get an error, just go back and press 'Close' without saving the template - that way your mistake won't be saved.  Here is the code with the sections removed:


If the preview worked ok, then the next step is to add the following code to the template just about the search text we found - here is the code we want to add:

<div class='customtitle'>
    <h1 class='title' style='background: transparent; border-width: 0px'>
        <b:include name='title'/>
    </h1>
    <span class='customdescription'><data:description/></span>
</div>


Find the search string again "div expr:style='&quot;background-image" that is just above the sections we removed. We're going to paste the code just above this line like so:

Alter HTML code in Blogger template

Press the Preview button to make sure the code works - here's what you should see!


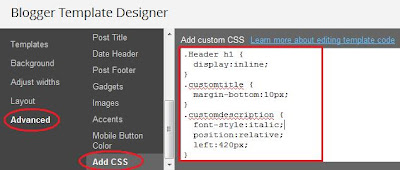
Now the title and description are positioned out of the image boundary. The last step for this part is to position those elements correctly using some CSS code in the Blogger Template Designer ('Advanced' menu item) again. Just add the CSS code in the image to position the title and description correctly. You might have to tweak the description left distance a bit:

Add CSS code to Blogger template

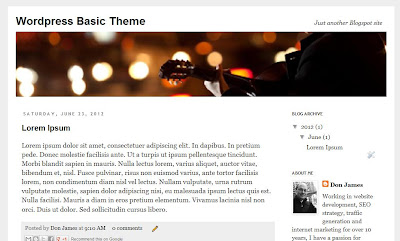
A bit of work - but, take a look at the template now - it's really coming together:

Wordpress theme for Blogger

Next up, the final settings for the sidebar and highlighting modifications. Enjoy!
Wordpress sample theme
Everyone loves Wordpress themes - am I right? Well, here i will tell you how to create theme like wordpress

Basic Theme Configuration in Blogger

Starting from scratch, the easiest way to build this theme is to start with Blogger's 'Simple' template. Here's the visual of my first step - just highlight the theme in the Template window:

Creating a theme from the Simple Blogger template

This template works well for a look-a-like Wordpress theme since it is easy to manipulate. However, it does have a few quirks that force you to use some simple, custom CSS code. I'll get to that later.

Even though we chose the Simple template, go back into the Template designer to change the Simple template color scheme to the more black and white look (if you're not sure how to get to the template designer, take a look at my post called How to Add a Background Image to Blogger - it shows how to get there). Just choose the Simple template on the far right (be sure to hit the 'Apply to Blog' button on the far upper right):

Blogger template designer

The next steps are to adjust your template's background, colors, links, and text sizings. Stay or go back into the template designer for now. We're going to set a group of values together. Let's start with the main body text size and color. In the 'Advanced / Page Text' settings, change the font to Georgia, size to14.7px (enter it in by hand), and the text color to #333333 like this: 

Modify Blogger page font in template


Next, set the 'Outer Background' to #eeeeee (just type it in with the # symbol) and leave the 'Main Background' to its default value:

Modify Blogger background color in template

Now we'll set the 'Links' colors to custom values (Note: there is an errorhere that is fixed in Part 3 - you can go ahead and alter the Links colors but you'll have to fix them later). Don't worry about the sidebar colors just yet - this will alter all of the base (#191919), hover (#191919), and visited (#bb2188) colors for both Posts and Sidebar links:

Modify Blogger link colors in template

The actual 'Blog Title' font and size will have to be modified next. Set the font to 'Arial', the style to Bold (just click on the 'B'), the size to 20px and the Title Color to (#191919):

Modify Blogger title in template


Next, set the 'Post Title' font to Arial and the style to Bold (again, just click on the 'B') with a 20px height like this:

Modify Blogger Post titles in template

If you noticed on the Simple template the 'Date Header' is reversed by default with the text white and the associated background grey. Let's reverse that by setting the text color to grey (#666666) and background to white (#ffffff). We'll alter the style in the next post:

Modify Blogger date field in template


Congrats! You've completed configuring all of the core base settings. Be sure to hit the 'Apply to Blog' button now to save your work like this:


As you can probably see by now, the template is starting to look much like the Wordpress theme above! However, let's do a few final steps to get a bit closer.

Customizing the Theme Description

One oddity in this particular template is a missing configuration to modify the blog's description text. First thing to do is add a blog description if you haven't yet by going back to the main menu and choosing 'Settings' like this:

Add a description to Blogger

Go ahead and enter your description by clicking on the 'Edit' link as shown above. I entered 'Just another Blogspot blog' for mine and save the setting. You should now see the description under the title of the template.

Our last step for Part 1 is to add a couple of simple CSS template changes. First, we'll add a CSS change that places a small margin at the top and bottom of the template to make it look more like the Wordpress theme. And, we'll also add some code to modify the font characteristics of the description.

Go back into the Template designer again and choose the 'Advanced' / 'Add CSS' section. Add the following code to your template like this:

Alter Blogger's description field

At the top you see the .content-outer section change which will add a margin at the top and bottom of your blog. Now, if you're advanced enough to know how to hide the standard Blogger navigation bar at the top, you don't need to add the 'margin-top:20px;' code (NOTE: UPDATE - I noticed a week later that this didn't work on Internet Explorer 8 - change margin-top andmargin-bottom to padding-top and padding-bottom instead -- so, you should have 'padding-top:20px;' and 'padding-bottom:40px;'. That works fine!). When the nav bar is hidden you get automatic padding. The second section is to modify the font of the blog's description in the '.Header .description' section. Just add both of the font declarations I have in the picture. Be sure to hit 'Apply to Blog' to save the changes.

This ends Part 1 - as you can see, we're getting close to the theme:

Wordpress theme for Blogger

Next up - some deeper modifications to add the top image, add a Page menu, and altering the sidebar. If you're ambitious enough, maybe you can try to do these yourself.
Powered by Blogger.
Blogger Template by blogger.com